Setting up your animated production for success will make or break it. I’ve asked myself the following questions many times, and thought it would be good to pass these tips forward to help you and your team get on the same page so you can start your production with the best chance of success. Let’s dive in.
Step 1 is, and always will be, story. However, this is step 1 of a series of posts to come about bringing your story/idea into production.
Disclaimer: To be transparent, In this post I offer up how we’re handling many of these challenges in Artella, but you are free to handle them in any fashion or with any methodology or platform you choose.
Choosing your software and version
When starting your CG animated production you will need to determine which 3D software application and which renderer or game engine you will be using for the duration of that project.
“Wait, what? You mean mean my team members can’t just use whatever version they want?”
Nope, software doesn’t tend to be completely forward or backwards compatible. You need to be clear with everyone coming onto your team which version they must use for your production.
In Artella you can specify which software applications and version your project uses via your project overview page (the only page seen by anyone in the community). This gives everyone the ability to know what is expected before joining your project.
If your project spans many years you may have to go through the difficult decision of upgrading to a new version of your core software applications. This is not as easy as it sounds and almost always causes a slowdown in the production as assets can break, not work, not render, not export and may need to be rebuilt.
For that reason, and if possible, I highly recommend you pick a version and stick with it. This is common practice even at the biggest studios, too.
Plugins
Every artist has their own custom flavor of tools and plugins they like to work with. This doesn’t tend to be too much of an issue so long as it is communicated to the team which plugins are required for your production. Here are some things we’ve learned about plugins.
- Once you’ve decided which plugins your project will use, make sure to communicate that information to your team.
In Artella, again, you can specify this information on our project overview page so that everyone is clear.
- Rendering plugins are the big culprits as they can inject nasty bits of code into your files that throw errors when loading, often in the form of script errors. Just having these plugins loaded on your machine can cause this issue to occur.
- If people have plugins on their machine that they use for other projects they simply need to turn “auto load” off on custom plugins that are not in use on your production. Again, this tends to be render plugins like Arnold, RenderMan, etc.
- Most of the time the errors given are benign and can be ignored, but ideally you want to keep your pipe clean so that information flows smoothly.
What is an asset?
An asset is anything that will be used in your production – namely, characters, props and sets.
Asset Management
There are mixed views on what asset management means. Asset management can mean management of the status of the asset – not started, in progress, on hold, final, etc. – or it can mean the files, versions and folders that make up that asset. I use asset management to mean the latter. In this sense, an asset management system; i.e. pipeline, is a system that manages all the files, folders and the relationships between them; i.e. dependencies.
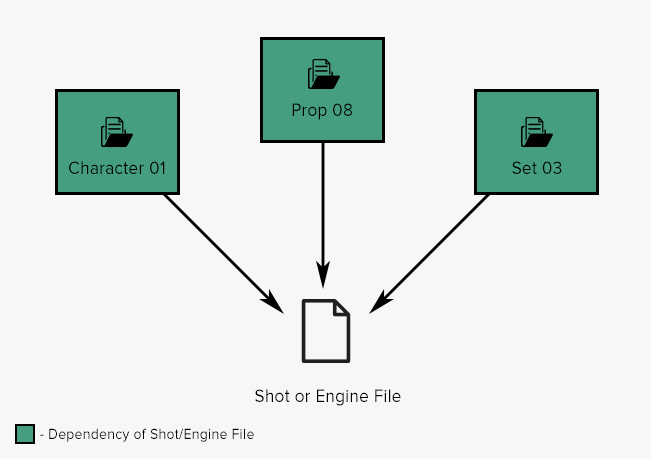
Dependencies
Dependencies are additional pieces of information that are required for your file to work properly. Keys are a dependency of a car. Without the keys you have a big piece, the car, but you can’t really do anything without the keys.
The same is true in 3D. In the image below you can see an example of 3 dependencies (a character, a set and a prop) that are required for the shot or engine file to open properly.
When opening a file with dependencies the software application will automatically look for the dependent files and, if it can find them, it will open the file. If the path has changed, or a file has been moved, the application will ask you to locate the missing dependency. In this case you’d have to browse to the new location of the file/s.
In a 3D application, when you reference a file that file then becomes a dependency.
Just be sure if you rename or move a file to a new location, any files that point to it will then need to be updated. Understanding this concept is important as it will empower you to decide if you want to really rename or move that file to a new location.
Tip: It’s easier to move files earlier in the production (asset development) than later stages (animation and beyond).
Asset development
Asset development is the creation of any piece that will be used on your production. Each assets tends to start with concept art, then goes into modeling and UV mapping, rigging, surfacing and even look development – more details on that in a future post.
You will be working on asset development all throughout your project, tweaking and refining them as you go. Here are some tips that have really helped us when developing assets during the pre-production phase.
- All your characters, props and sets should be built to the same relative scale. I’ve always built assets to real world scale in centimeters. An average male in feet would be 5 feet 10 inches tall or 177cm. Google is a good resource for converting feet to centimeters.
- This means a fairy (character) would fit in a human character’s hand.
- And a bench (prop) would be at the right height for a human to sit on.
- And a subway station (set) would be to scale.
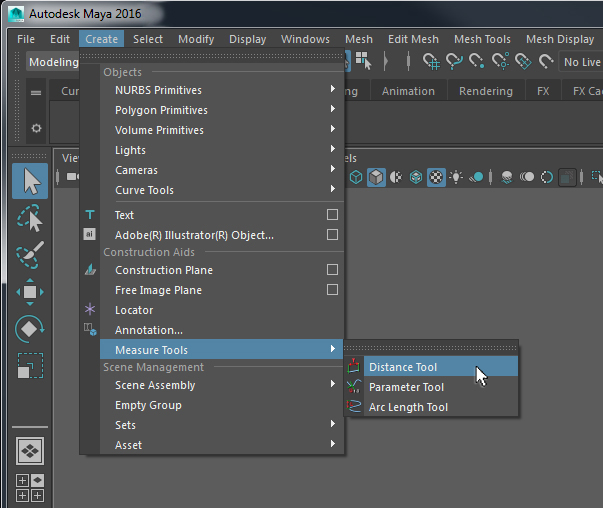
- You can use the measurement tool in your 3D software (see image below for the location in Maya) and/or build a dummy character as a point of reference to bring into your file when setting the scale of your asset. This point of reference can then be deleted from your file after you’ve scaled your base model to the proper dimensions.
- Why centimeters? I tend to use Maya for my productions and CM is their default measurement. You can change this, but most studios do not, so I don’t either.
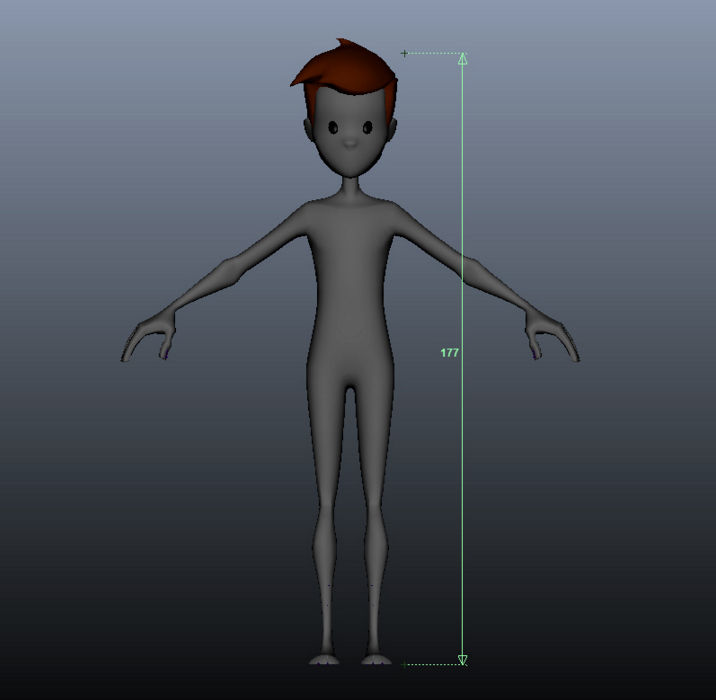
Stewart character courtesy of Animation Mentor
- Because measuring your character only takes a moment, it’s great to do this up front as it can really kick you in the butt down the road if you wait until the asset is fully rigged as building in a universal scale control can be tricky and cause problems with the rig, textures, etc. Spend a moment up front and do this.
- Defining the scale of an asset also starts to give you a good sense of exactly how much has to be built (the sets and props) based on what is seen in the shots instead of working on infinite details that may never actually be seen in camera.
- Remember, we’re indie creatives and we need to be economical anywhere we can.
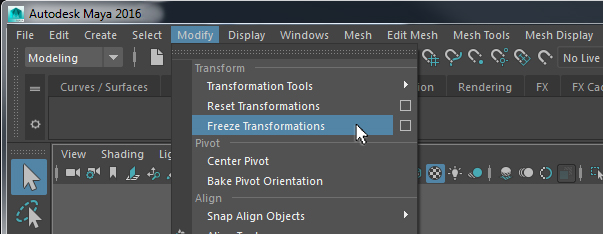
- Once you have your asset properly scaled, be sure to freeze transforms. This puts the XYZ values at zero which means this model is now in a good clean state to continue with.
Referencing and Importing files
When you build assets you are opening files directly, making changes and saving the iterations as you go. One file per asset.
Here comes some nitty gritty workflow tips that I’ve found through lots of trial and error to work well.
When it comes time to go into shot production (previs, layout, animation, etc.) you want to REFERENCE assets into one master layout file per sequence. The thought here is that if you make edits to the individual assets as you go, change the model, rig, hair, clothes, etc., then you can simply update the reference in the shot/s and that will inherit the position and any animation that has been done thus far – so long as the rig has not changed.
The Master Layout File
Uber nitty gritty goodness ahead.
The master layout file is key. Each sequence should have one master layout file. This means one file that references in all the characters, props and sets for that given sequence. Position the assets where they need to be. Since all of your assets are to scale (as mentioned above) you can assemble the placement of the assets in their proper locations in this one file; i.e. Bed in bedroom, street light on the street corner, etc.
Once you start creating shots you can IMPORT this master layout file into each of the shots. That way each shot starts with the same base file. Although referencing this file into the shot might make sense, you actually import the file to avoid what is called, “nested reference”- more than one reference deep. Nested reference tend to create unforeseen issues that are hard to trouble shoot, so keeping only one level of reference is a best practice. Also importing the master layout into the shot files will maintain all references that have been made in the master layout file. So if an asset is updated, this change can be communicated to the team and they can update the asset/s in their shots as needed.
Ascii VS Binary files
When saving your 3D files it is an industry best practice to save in Ascii (human readable text) format. Binary is not human readable and looks like a bunch of boxes and wingdings when opened in a text editor. If a binary file gets corrupt it’s nearly impossible to try and fix it. Ascii files, on the other hand, can be opened in text editors and troubleshot if issues arise.
Maya, defaults to binary so if you’re using it be sure to switch it to ascii when doing your first “save as”.
In Artella, when you make a new asset it automatically creates the files and folders for you to start with. It even puts a blank ascii file in place for you to start from. We’re trying to take the guesswork and minimize the areas we’ve seen cause problems.
Blessing a file
Blessing a file is a concept I learned when working at Pixar. Essentially it means making sure the file is clean and ready to go to the next stage of production through an official buy off process.
For instance, when a model is complete the rigging artist will want to go in and make sure the file has enough spans in areas that bend; i.e. elbows, knees, fingers, etc. and that the file is indeed at the right scale. A surfacing artist would want to go in and make sure the UV’s are good to go for texturing and zero transformed. After both have been bought off on the file is then what is called, “blessed” and the rigger and surfacing artist can begin their work with confidence.
Not doing this step can result in having to go back to modeling and that means the potential of lost work.
These tips are just some of the things I’ve learned to set up productions to flow smoothly and I hope they help you and your team avoid them and save time.
I’ll continue to add to this post over time with new areas that I feel fit in the “nuts and bolts” section of production setup.
If you have any questions or areas you’d like to know more about post them in the comments below and I’ll be happy to address them. Thanks!
Article By: Bobby Beck – Co-Founder and CEO of Artella